

Creating a case
A case is a single instance of a flow tied to one client. Once created, the client is notified and can begin uploading the requested documents.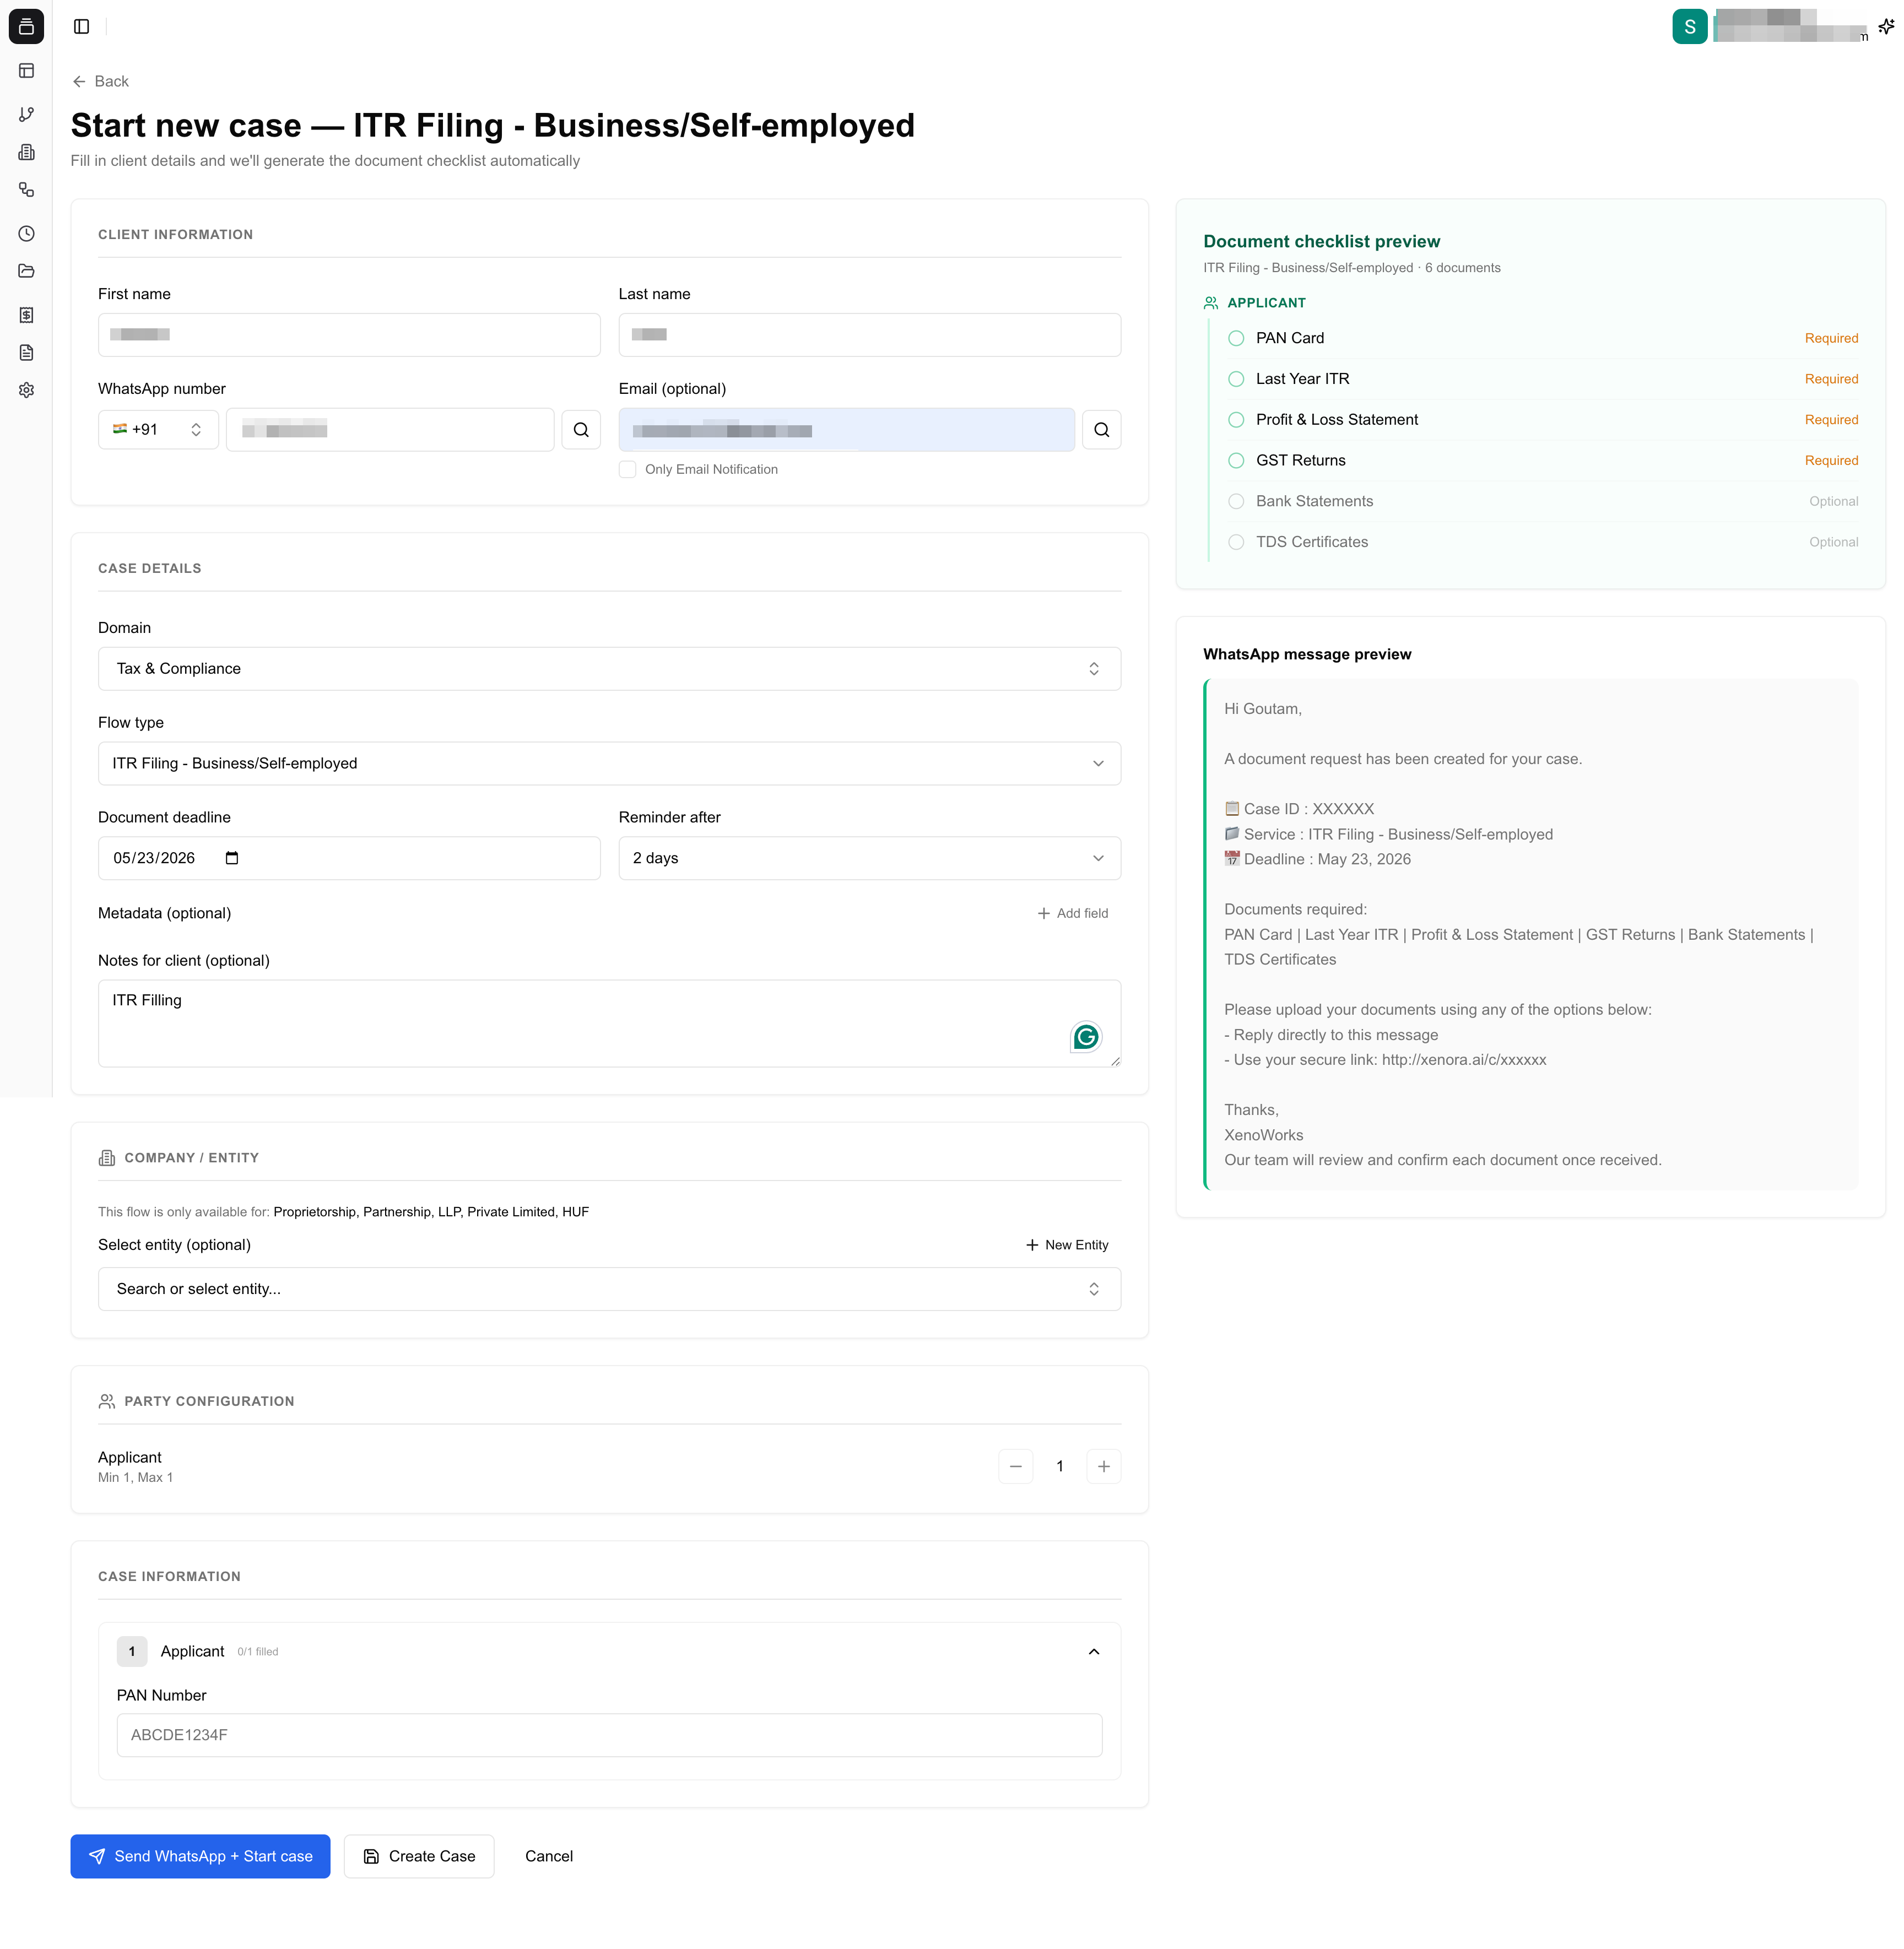
New case creation form
1
Choose a flow
From the Flows page, click the flow template you want to use, or click New Case.
2
Fill in the case form
- Client name — the person you are collecting documents from
- Client email and/or mobile number — where reminders will be sent
- Entity / Company — the organization this case belongs to (optional)
- Deadline — the date by which documents are expected
- Reminder days — how many days before the deadline to nudge the client
- Custom fields — any extra information specific to the chosen flow
- Internal notes — private notes only your team can see
3
Choose how the first notification is sent
- Send WhatsApp + Start Case (recommended) — creates the case and sends email and WhatsApp notifications.
- Create Case — don’t send yet. Create the case silently and send later, or upload documents on behalf of your user.
4
Click Create & Send
The client immediately receives a message with the document checklist, deadline, and a secure upload link.
Reminder cadence
Reminders are scheduled when you create the case, based on the Reminder after value you pick on the form. Options are 1, 2, 3, 5, or 7 days before the deadline. Reminders go out on both WhatsApp and email — same channels as the original request. If the case is still open at the deadline, follow-up nudges continue until you mark the case complete or cancel it. You can also send a reminder manually any time — see Send Notification below.One active case per mobile number (WhatsApp)
To avoid confusing clients with overlapping conversations, Xenora allows only one active WhatsApp case per mobile number at a time. If a number already has an Open, In Review, or Reopened case:- New cases for that number switch to email-only notifications automatically.
- The mobile field on the case page shows an amber warning icon to flag that WhatsApp delivery is paused.
- Once the existing case is Completed or Cancelled, WhatsApp resumes for any new case on that number.
Notifications and file upload
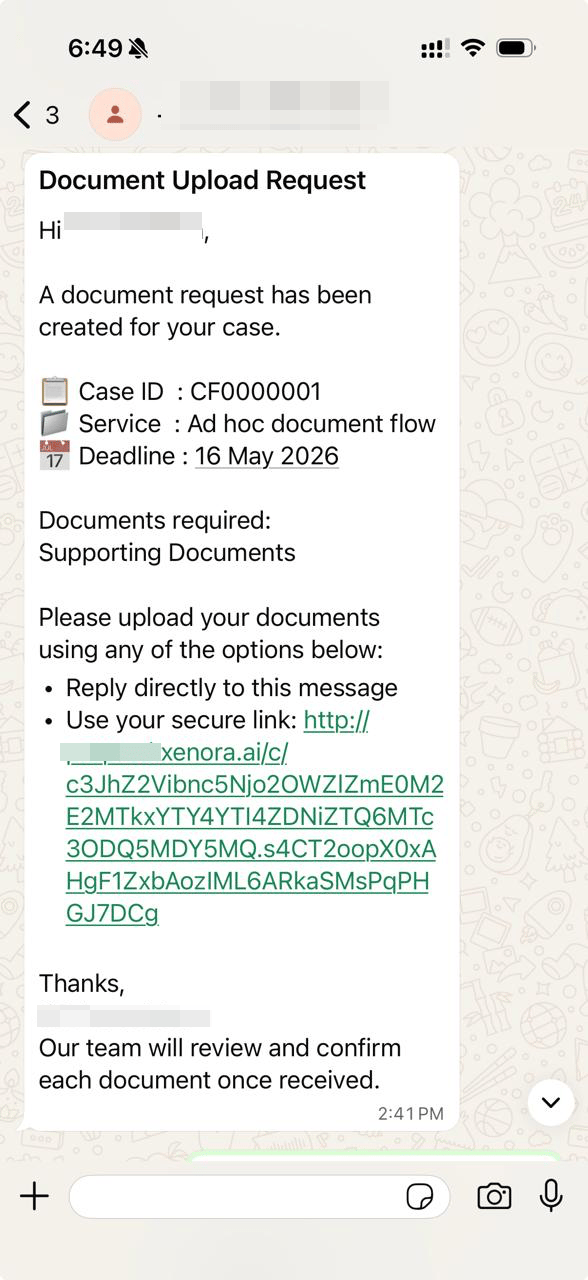
Once you create a case, your customer receives an email and a WhatsApp notification with the list of requested documents. They can submit documents in two ways:Reply on WhatsApp
Upload documents directly in the WhatsApp conversation.
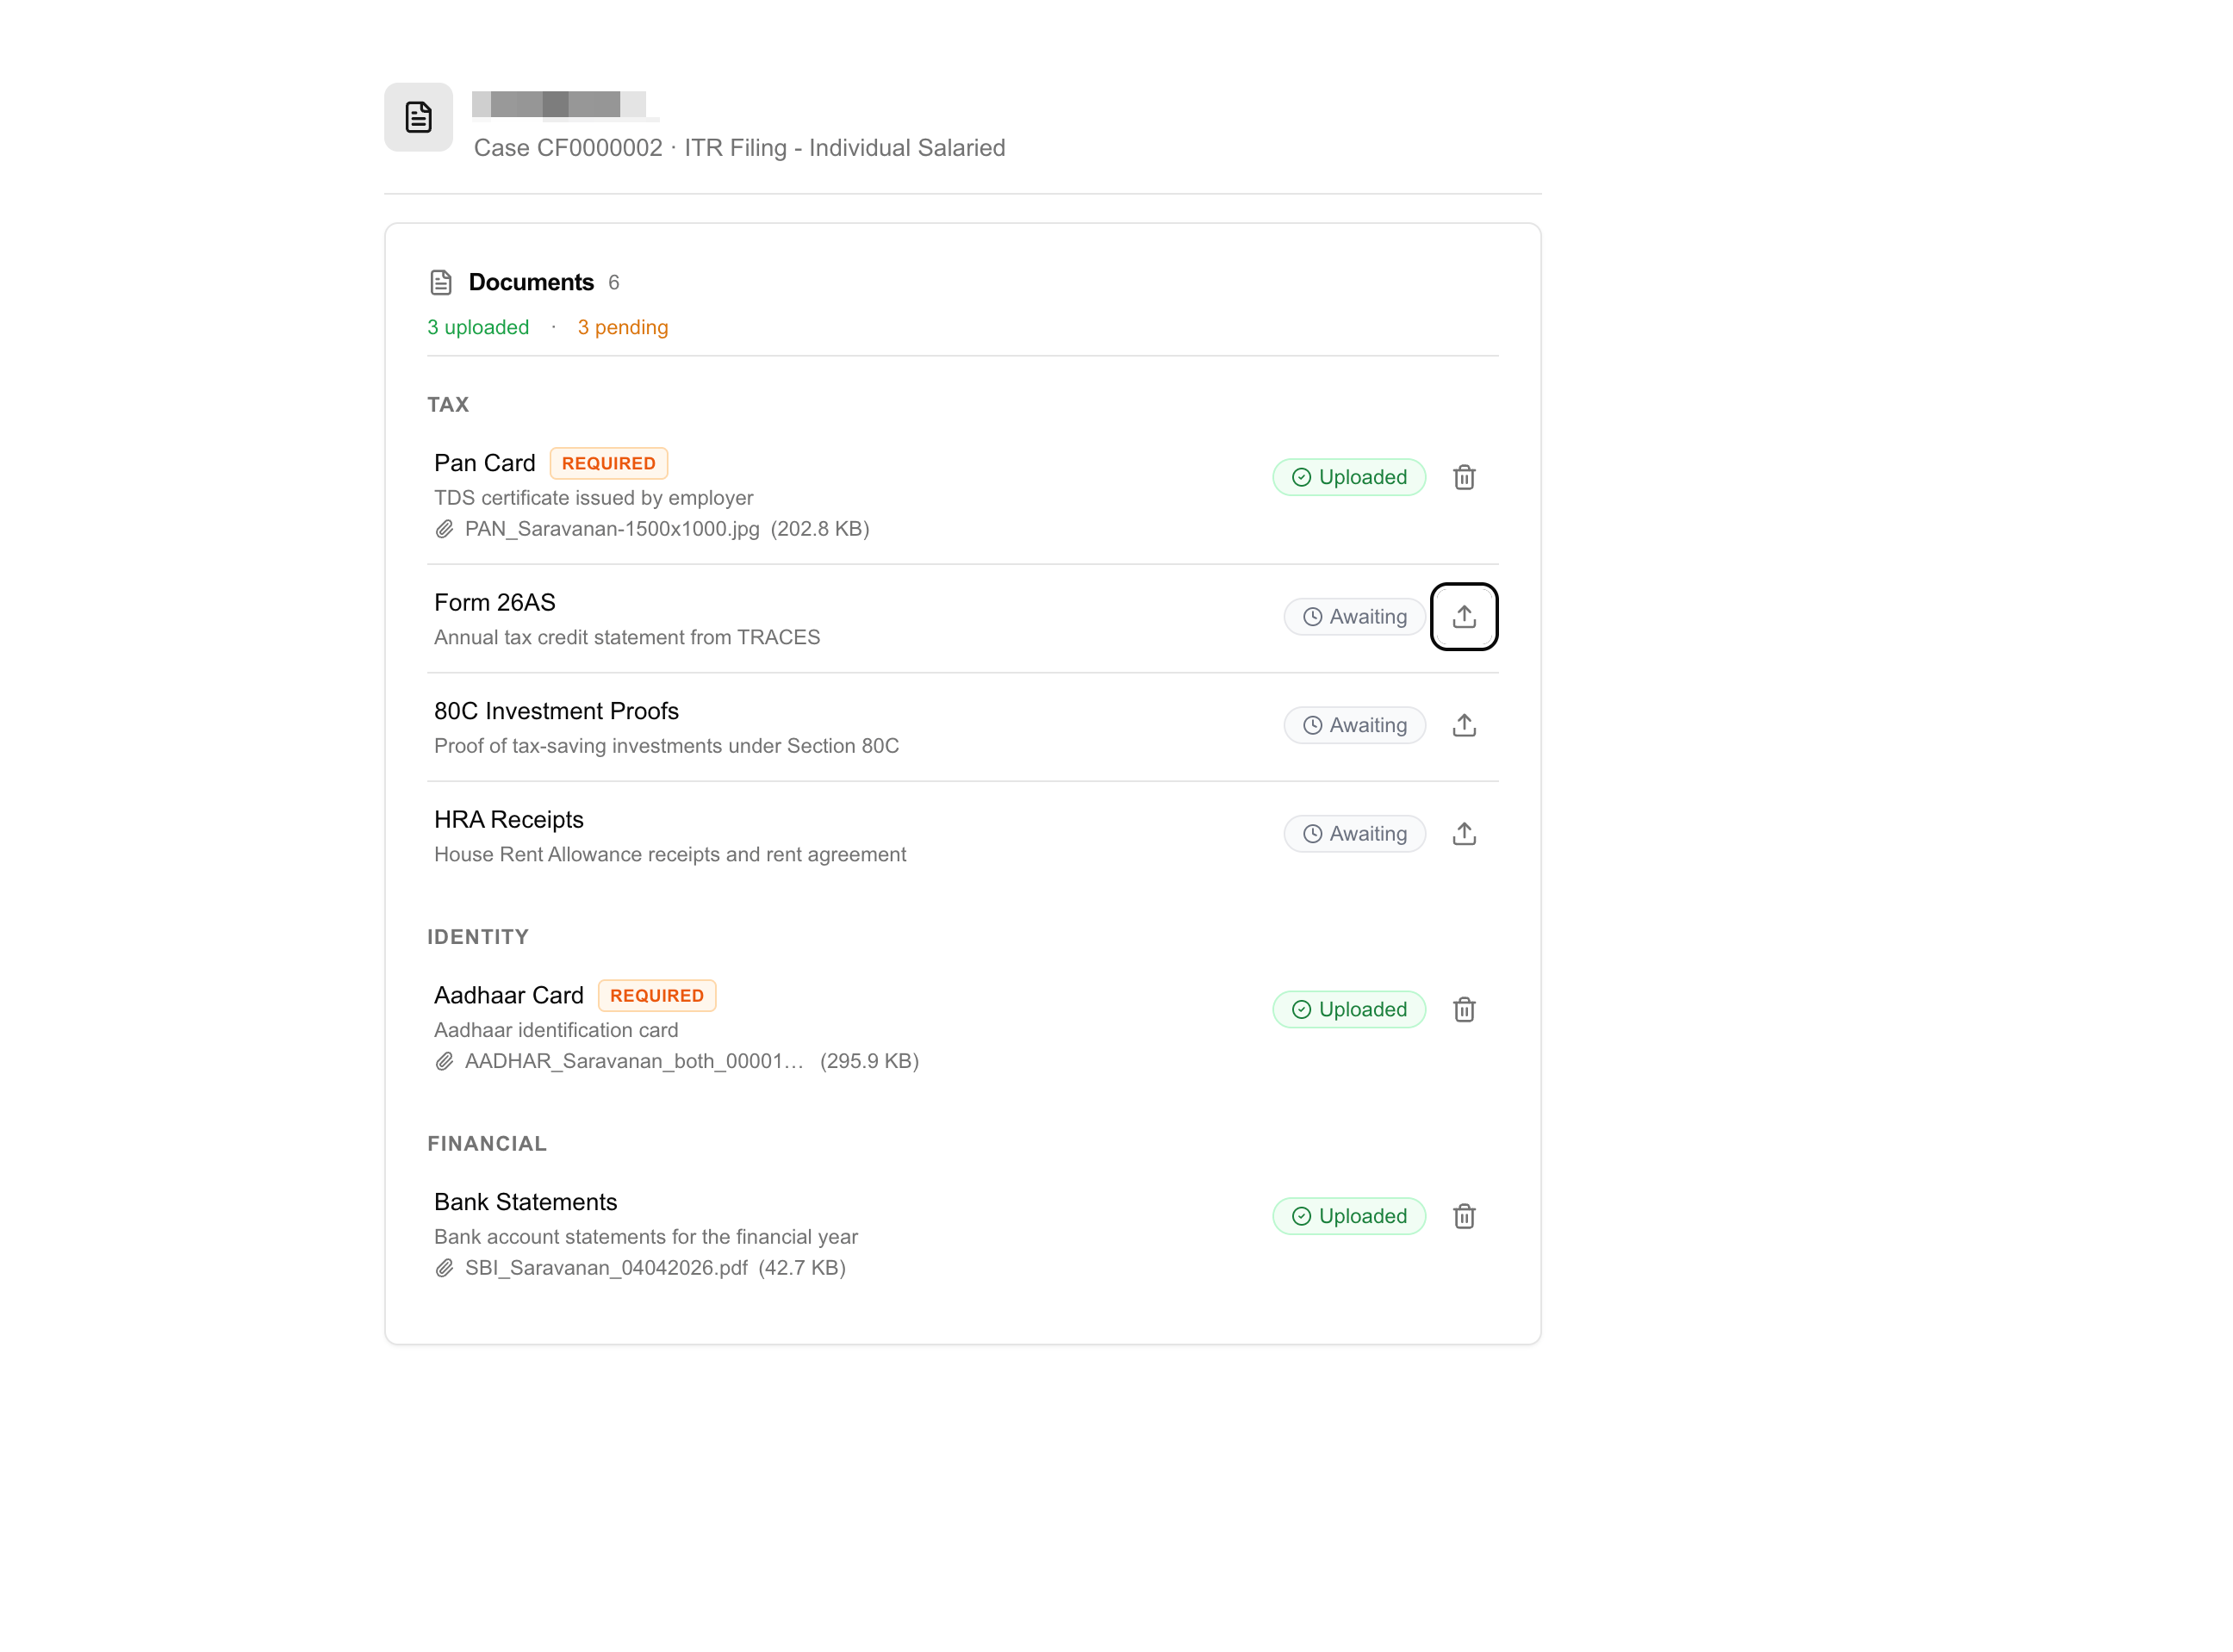
Use the secure email link
Open the link in the email to upload documents through the web portal.
- WhatsApp message
- Email (client view)
Working with documents
When your customer uploads a document, you’ll receive a notification. You can also check pending cases anytime from:- My Cases within a flow
- Pending Cases or All Cases in the main dashboard
AI validation
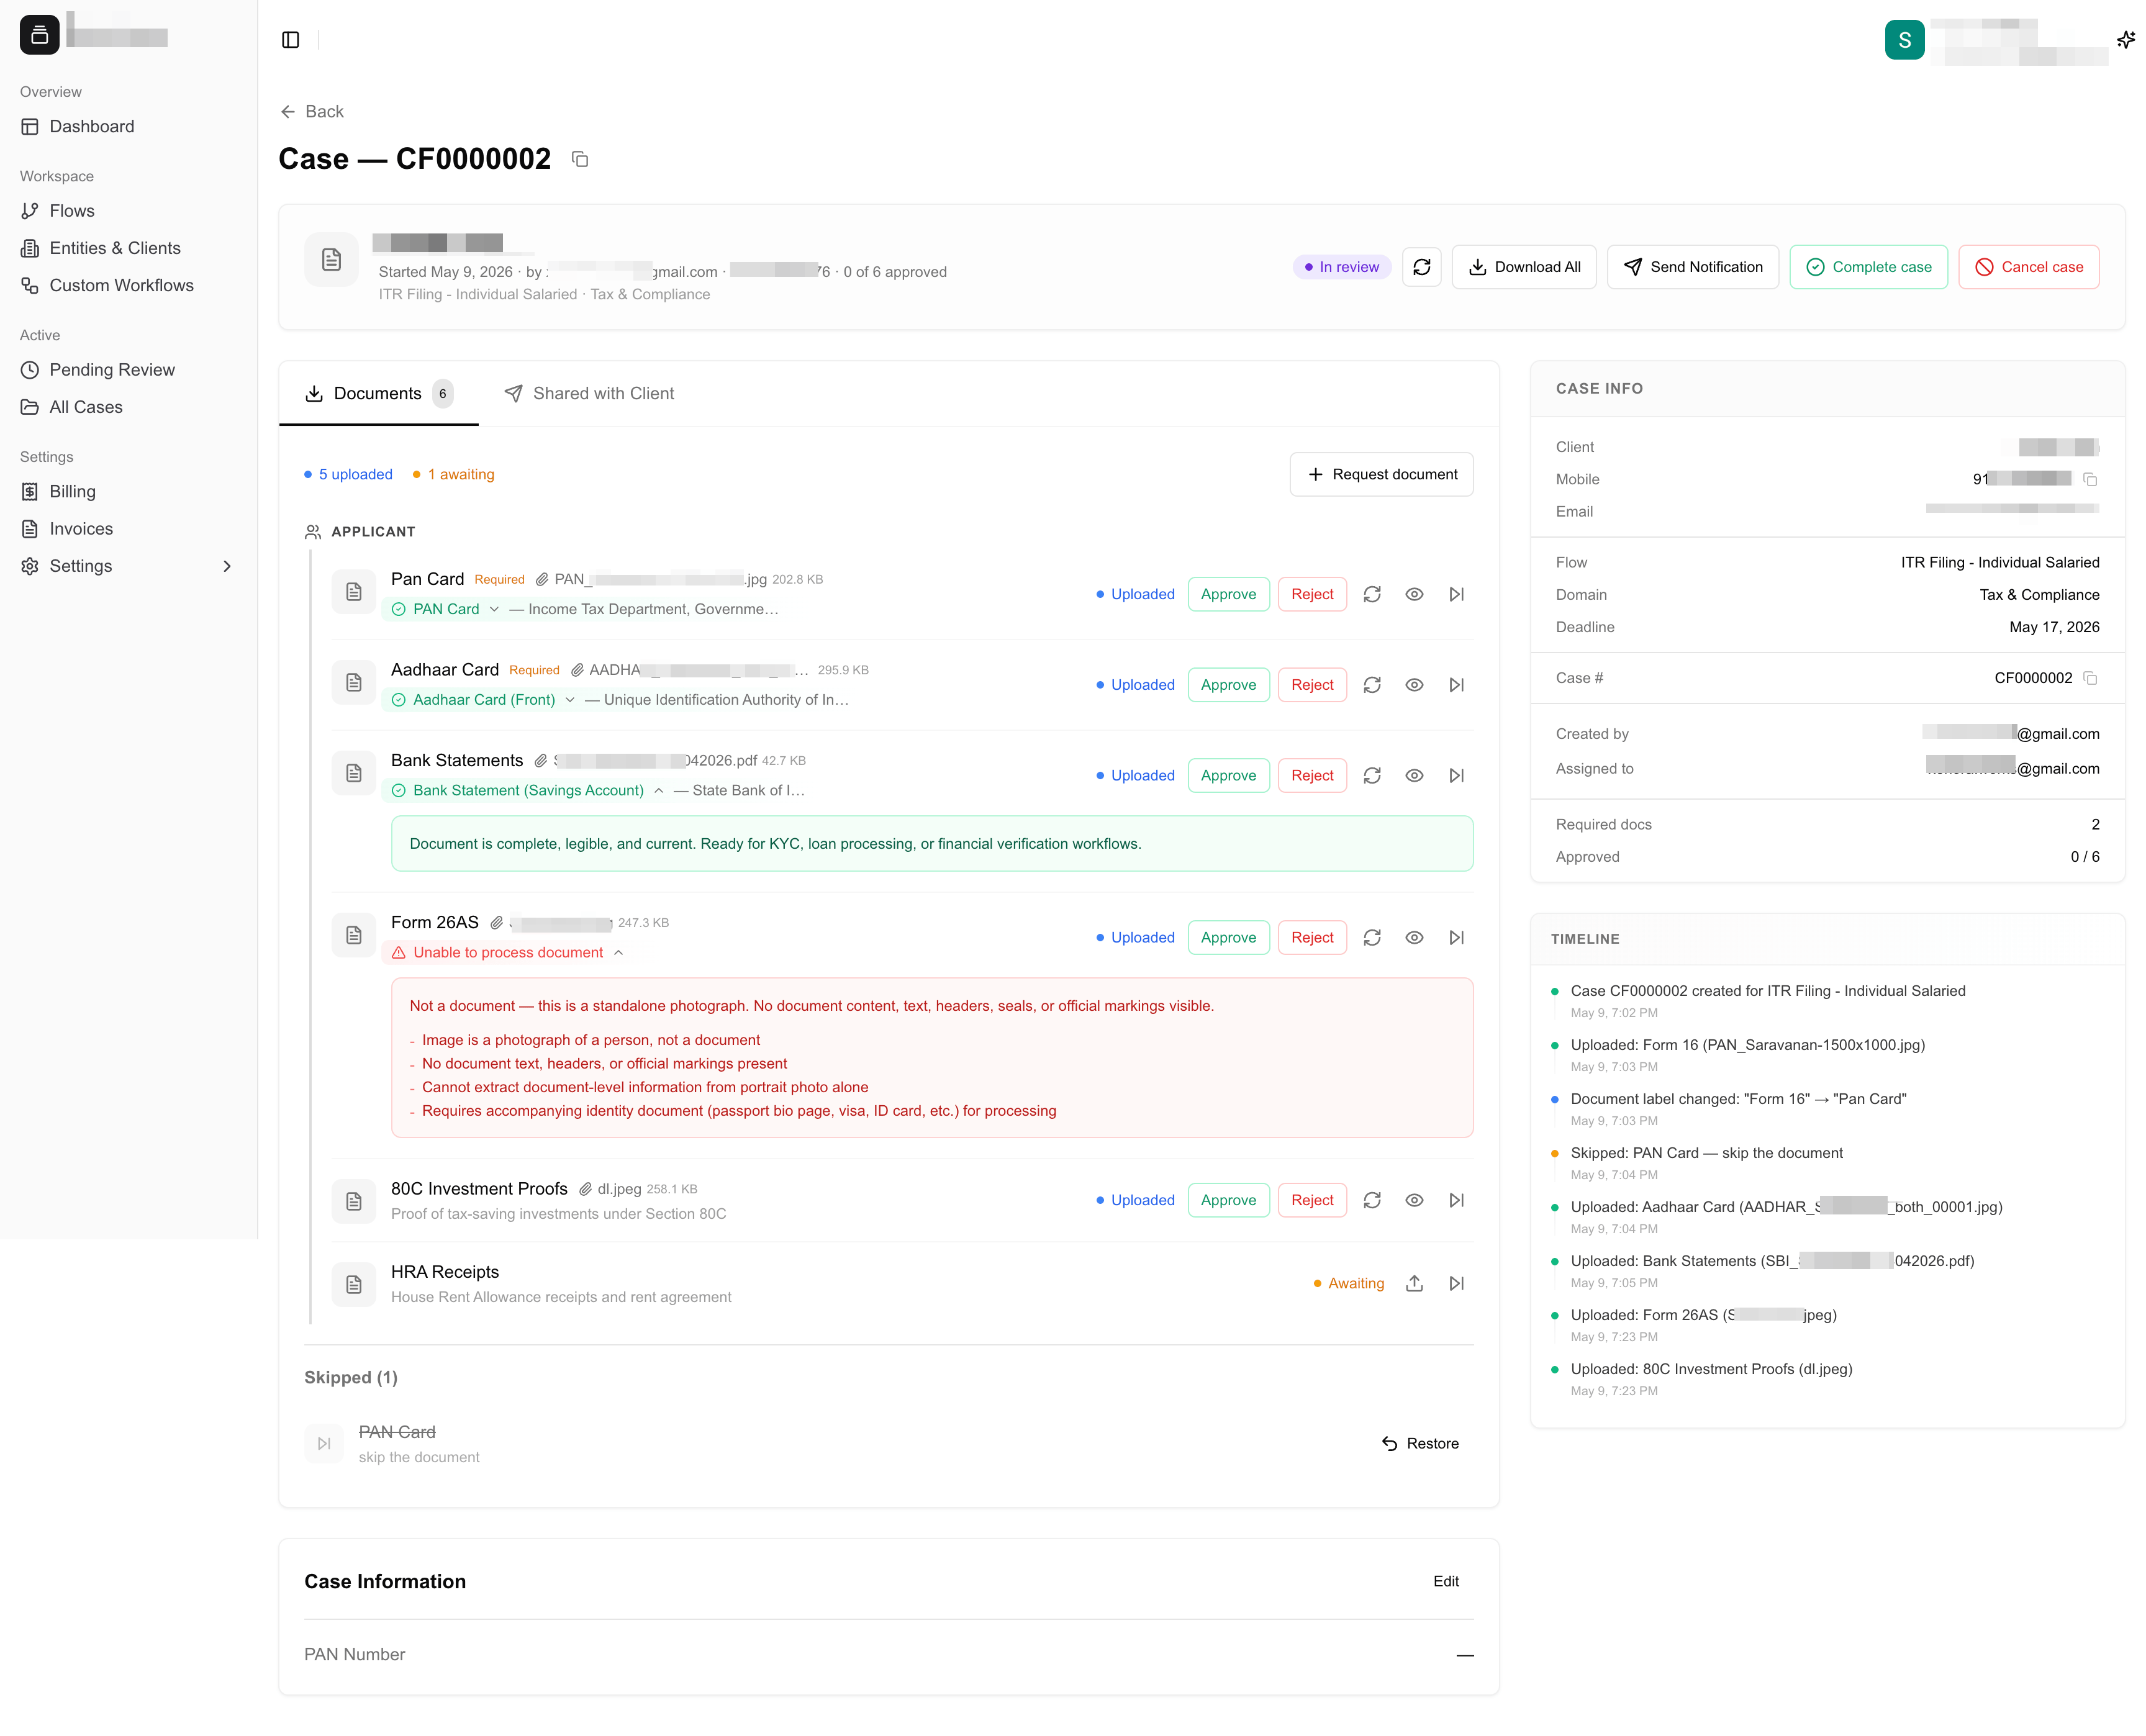
Each uploaded document is automatically validated by Xenora’s AI. The system marks each document as one of:Valid
The document passed all checks.
Invalid
The document failed validation (e.g., wrong document type, missing fields).
Unidentifiable
The document couldn’t be read automatically — usually a blurry image, a regional language, or an unrecognized format. You can still open it and review manually.
Manual review
After AI validation, you can:- Approve the document if it meets your requirements.
- Reject the document — the customer will be notified to upload it again.
- Skip the document if it’s not required at this stage.
Working with documents
Rename a document
The names that come from a built-in flow are generic. If “Bank Statement” needs to be “April 2026 Bank Statement” for this client, just click the document name on the case page and type the new label. Press Enter to save. The new name is what the client sees in their WhatsApp message and email reminders — so use it to give them context (date ranges, financial year, document version) without sending a separate message.Request an additional document mid-case
Sometimes a client uploads a document and you realise you need one more — a missing supporting paper, a clarification, an extra signature. Click + Request document at the top of the documents list to add a new requirement without creating a new case.1
Name the document
Type what you need (e.g. “Form 16A — FY 2025–26”).
2
Add an optional description
Give the client context — what it is, where to find it, what to do if they don’t have it.
3
Mark required
If the client must upload this before the case can close, toggle Required.
4
Save
The new document appears in the client’s checklist and is included in the next reminder.
Per-document actions
For each document, you have these options:Approve
Approve
Accept the document. The case moves forward; if it’s the last required document, the case is ready to be completed.
Reject / Request re-upload
Reject / Request re-upload
Ask the client to upload again. A dialog asks for a reason — that reason is sent to the client on WhatsApp and email so they know exactly what to fix. Examples: “Image is blurry — please rescan”, “Wrong document type — we need the PAN card, not Aadhaar”.
Skip
Skip
Mark the document as not required for this case. Useful when the checklist asked for something that doesn’t apply to this client. The document stays on the case (visible as “Skipped”) but isn’t required to complete.
Unskip
Unskip
Reverse a Skip. The document goes back to Awaiting Upload.
Remove (custom documents only)
Remove (custom documents only)
Delete a custom-added document from this case. Documents that came from the flow template can’t be removed — Skip them instead.
View / Download
View / Download
Open the uploaded file in a new tab, or download it locally.
Case Information
The Case Information card on the right side of the case page shows the structured fields captured for this case — flow name, deadline, custom fields defined by the flow, and per-party data for multi-party cases. To edit any field, click Edit at the top of the card, change the values, and click Save. Changes apply only to this case and don’t affect the flow template.Internal notes
The Internal notes field on a case is visible only to your team — clients never see it. Use it for context that doesn’t belong in a document:- A phone-call summary with the client
- A flag for your senior or partner
- A deadline you negotiated separately
- Why a particular document was skipped or rejected
Case timeline (audit trail)
Every case carries a chronological Timeline on the right side of the case page. Every meaningful event is recorded with a timestamp and the person (or client) who triggered it:- Case created, assigned, reassigned
- Document requested, uploaded, validated, approved, rejected, re-upload requested, skipped
- Notifications sent (manual or automatic reminders)
- Case fields or notes updated
- Custom document added or removed
- Case completed, cancelled, reopened, archived
Assigning a case to a team member
By default, the person who created the case is the assignee. To change it:1
Open the case
Go to the case from My Cases, Pending Review, or All Cases.
2
Find the Assigned to field
In the Case Info panel on the right, look for Assigned to.
3
Pick a team member
Click the dropdown and select the team member who should own this case. The change is immediate; the new assignee will see the case in their My Cases view.
Assignment doesn’t restrict access — any team member can still view and act on the case. The assignee is the person responsible, used for workload reporting and the “My Cases” filter.
Multi-party cases
Some flows (legal matters, loan applications, partnerships) collect documents from more than one party in the same case — for example, a borrower, a co-applicant, and a guarantor. In those cases, the documents list on the case page is grouped by party. Each party has its own checklist, its own progress, and (when needed) its own WhatsApp link. Reminders go to the right phone number for each party automatically.Case actions
Once you’ve opened a case, several actions are available from the top of the page:Send Notification
Send Notification
If a customer hasn’t responded in time, click Send Notification to remind them. The reminder is sent through both WhatsApp and email — the same channels used for the original request.
Complete
Complete
Once all documents are reviewed and approved, you can mark the case as complete to close it out. The client receives a “Case completed” notification.
Cancel
Cancel
If a case is no longer needed — the customer has withdrawn the request, or the requirement has changed — click Cancel to stop the case. The customer is notified that the case has been cancelled, and no further uploads are accepted.
Reopen
Reopen
Reopen a completed or cancelled case if something changed and you need more documents. The case status returns to Reopened, the client can upload again, and any previously approved documents stay approved unless you reject them.
Archive
Archive
Completed or cancelled cases can be archived. Archived cases remain in the system for audit and reference, but are moved out of your active view to keep the dashboard focused on ongoing work.
Delete
Delete
Permanently delete an archived case and all its files. This is different from Cancel (which stops a case but keeps records) — Delete cannot be undone. Use this only when you’re certain the case and its documents are no longer needed for compliance or audit.
Download All
Download All
Download every document the customer has uploaded as a single ZIP bundle. Useful when handing off a completed case to a colleague, archiving locally, or sharing with a client.